IntroductionIn my first tutorial, I introduce the Composed Systems' open source framework called the MVA Framework. We looked at how to port a common UI application to the MVA style of programming. This tutorial picks up where I left off and covers how to have more than one UI in an application. The Main course: Our task for this meal...Our last application was largely unremarkable on the surface, but under the hood we architected it to let us easily swap out one UI for another. What if my application needs more than one UI? How do I decompose a single UI into more modular UIs? In this tutorial I'm going to introduce a few more classes and concepts that'll allow us to host multiple "widgets" in a UI. We're going to make the UI you see below composed of two "widgets". One widget is given the responsibility of stopping the application by presenting a stop button to the user. The other widget simply has a ring control that presents options to a user. 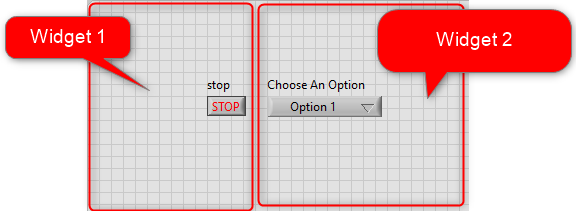 Let's get CookingUsing our same abstract graphics from the first tutorial, the goal is to create the following: 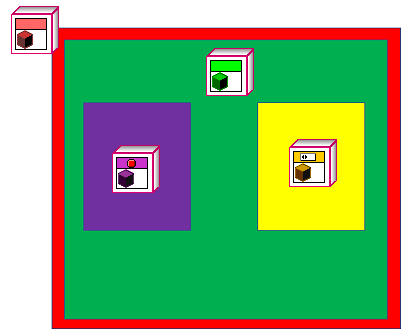 Here, the red class (IViewModel.lvclass) is a thing designed to host other things. In the first tutorial we hosted a UI (IViewable.lvclass, the purple class). Now I'm going to introduce a new concept: the view manager (IViewManager.lvclass; that's the green class above). Among its other responsibilities, the View Manager is responsible for defining the layout of the widgets. We'll talk about other responsibilities in later tutorials. Our two widgets are are both of type IViewable.lvclass (the purple and the yellow classes). Organizing Your UI Layout- The View ManagerAs mentioned above, one of the View Manager's responsibilities is to define the layout of a UI. Defining a layout means putting down one subPanle per widget. To create a View Manager: 1. create a new Actor Framework actor and inherit from IViewManager.lvclass: "...\MVA Tutorials\2 - A Community of Two\gpm_packages\@cs\mva-framework\Source\Framework\IViewManager\IViewManager\IViewManager.lvclass" 2. Create an override of the Actor Core. 3. Place your sub panels on the front panel. 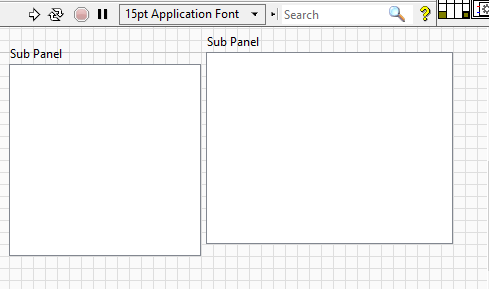 We need to make the MVA framework aware of these subpanels. To do that we call "New Protected Subpanel.vi" (...\MVA Tutorials\2 - A Community of Two\gpm_packages\@cs\mva-framework\Source\Framework\IViewable\ProtectedSubpanel\New Protected Subpanel.vi). Then we add the subpanel references to our Actor's private data 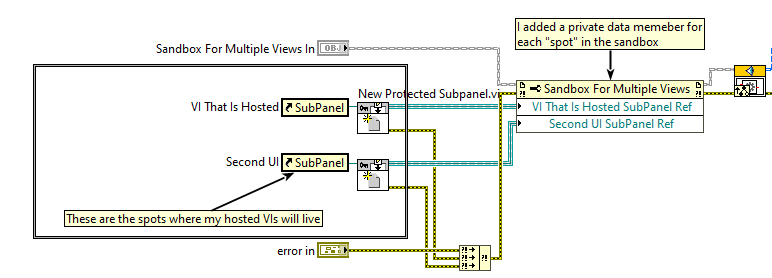 Creating the widgets follows same procedure described in the first tutorial. So now we have all the ingredients we need. We have a thing that hosts layouts (the red class, aka IViewmodel), a thing that defines the number and layout of widgets (the green class, aka IViewManager), and two widgets (the yellow and purple classes, aka IViewables). A widget Handling EventsIn our previous tutorial, the stop button value change event was conveyed out of the View (Purple class) to the ViewModel (red class) in the override of "catch nested updates". Then the view model stopped itself which caused the framework to shutdown all nested views. What if we don't want to convey an event outside of a view for handling, but rather handle the event in the view itself? There are two concepts I'll need to introduce here: 1. The Framework API that allows us to register things for events, 2. The thing that handles the event. In the actor core of the yellow actor you'll see a new VI called "Register For Control Events.vi". 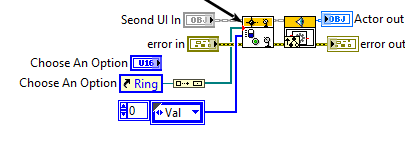 Register for Control Events takes an array of control references and an array of event types as inputs. What we're telling the framework is "Hey MVA, when you see any of these controls do any of these events, then receive and act on the value change event." Note the array of control references and the array of events is NOT parallel. If the framework sees any of the events in the event array for any of the controls in the control reference array, it will act. The thing doing the acting is an override of an IViewable called "Receive Value Change Event.vi". On an event, this VI will execute and looks like: 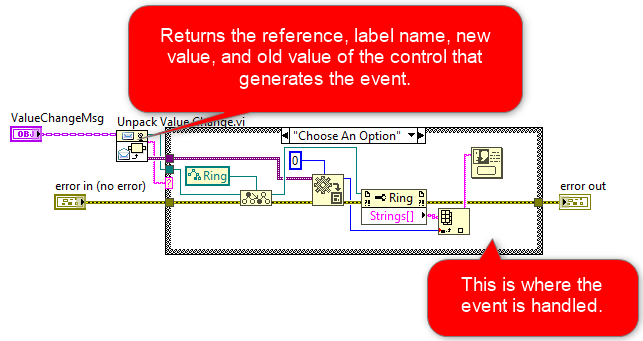 In this VI, we take the user's selection from the ring control and show it in a one button dialog. Think of this case structure to be similar to the frame of an even structure. But like our deconstructed hamburger from the first tutorial, we've cut up the even handler into more granular parts. Here's what I mean:  The block diagram on the left is our standard event structure set to handle a value change on control labeled "Choose An Option". It provides the control reference, old and new values, and time. Our MVA block diagram on the right does the exact same thing using APIs instead of the event structure. Paging our Chef. Time to Plate our food!Now we just need a chef to assemble our ingredients. And if you'll recall from the first tutorial, that's the responsibility of the Assembler. Below is our assembler for this application. Again, I've included pictures to help illustrate what's going on. 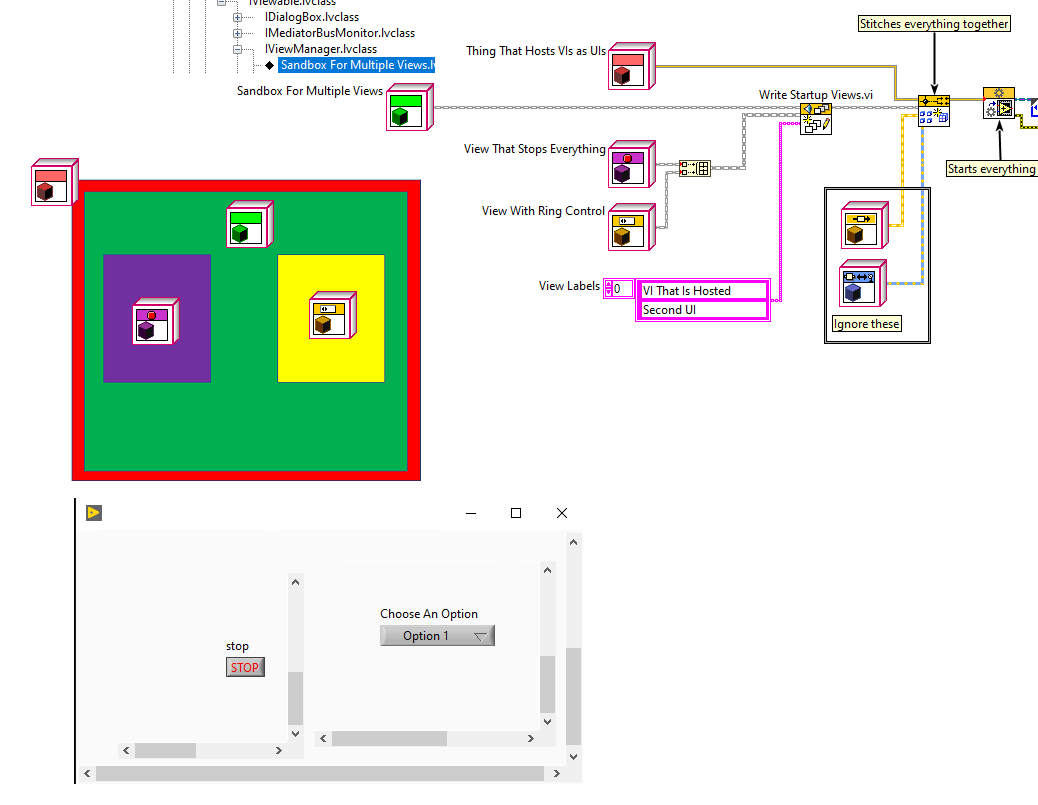 Something to note: we've introduce a new VI called "Write Startup Views". This framework VI does two things: 1. Indicates nesting, 2. Assigns a name to a widget (we'll see where the name is used shortly). "Write Startup Views.vi" embeds views into a View Manager. You'll notice our green class (view manager) is passed in as the top left input, and views and names are passed in as parallel arrays. We're directing the framework to insert the view classes into this specific view manager and then we give those views names. We give the views names so the view manager knows which subpanel will host which view. Inserting the correct view into the desired subpanel happens in the "Initialize Front Panel" of our View manager, shown below: 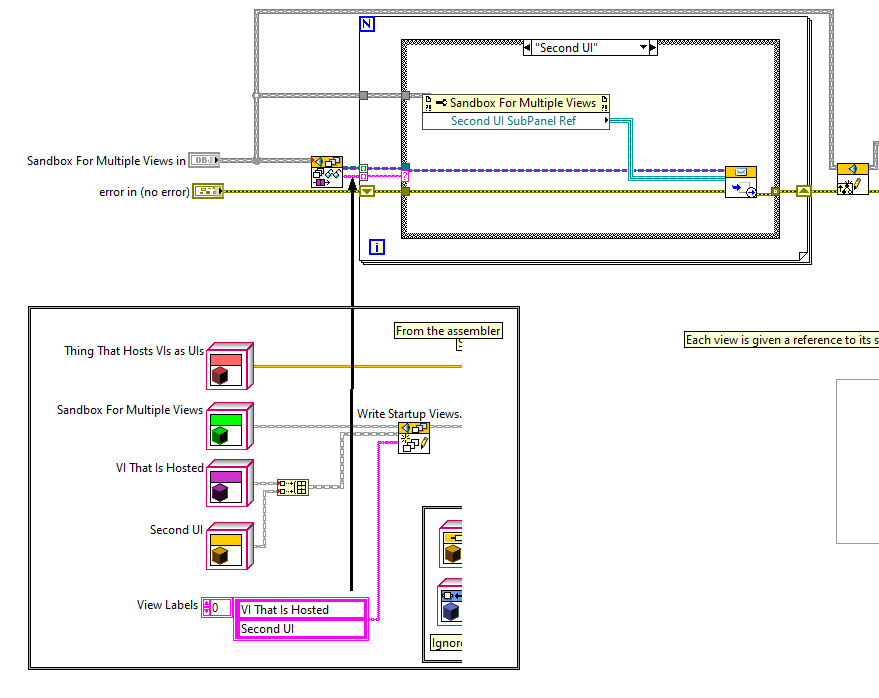 In our override we use a for loop to scan through the array of names. In each case, we select the specific Protected subpanel reference (we created the subpanel references earlier in this tutorial) and pass in the enqueuer of the view to host. "Send Insert Front Panel" is the framework VI responsible for insert a view into a subpanel. Bon AppetitDone and Done! We now how a modular UI composed of two widgets.
So was it worth it? Well... now I can easily swap in any widget I want. But here's a cool bonus. Let's imagine you like the UI of the widget but not it's behavior. Since events are handled in an override called "Receive Value Change Events" all you would have to do to create new behavior is make a child View from the parent and override its "Receive Value Change Events" and call the child in the assembler. That's kinda cool! To whet your appetite (aka preview for the next tutorial), our two widgets compose the UI, but we'll likely want them to communicate with each other. I'm going to borrow from one of my all time favorite TV shows "Star Trek" to demonstrate how we open hailing frequencies between the two views. Prepare to make it so!
0 Comments
Leave a Reply. |
Tags
All
Archives
October 2019
LabVIEW Blogs |
 RSS Feed

Powered by the Panda Ant
|